Appindicator for Hamster part 2

This week I’m supposed to be on holiday but I decided to spend some time on my appindicator for Hamster. To be honest, though, a merge request on github from Izidor Matušov, together with our discussion in the merge review thread, was what made me want to focus on hamster again. He provided a light monochrome icon, based on the original icon, (to use with the Ambiance theme) and some code to switch icons when the indicator requires attention. I worked more on the light icon and made a dark variant for the Radiance theme, so that we finally have monochromatic icons for hamster. Although icon design is definitely not my field, I’m quite happy with the results (help is always welcome though).

The main problem I wanted to solve was to allow users to see when hamster has an active task, without having to click on the indicator. I implemented two solutions but I enabled only one by default:

  • I added a slight blue glow (which you can disable) to the icon so that you can see when there is an active task in hamster.


  • I made it possible to have a text label (disabled by default) with the current activity beside the icon. This is quite similar to how the old gnome applet used to work. You can also set the maximum length of this label (the default is 20 characters).

Finally, as promised, I packaged the indicator and set up a PPA with packages for both Natty and Oneiric.

Note: in Oneiric you’ll also have to install my patched hamster-applet, otherwise hamster-applet will crash looking for gnomeapplet (which we no longer ship).

If you want to configure the indicator you can either open gconf-editor and look for /apps/hamster-indicator/ or follow these steps from the command line:

To enable/disable the icon glow:

$ gconftool-2 --set "/apps/hamster-indicator/icon_glow" --type bool "false"
$ gconftool-2 --set "/apps/hamster-indicator/icon_glow" --type bool "true"

To enable/disable the activity label:

$ gconftool-2 --set "/apps/hamster-indicator/show_label" --type bool "true"
$ gconftool-2 --set "/apps/hamster-indicator/show_label" --type bool "false"

To set the maximum label length:

$ gconftool-2 --set "/apps/hamster-indicator/label_length" --type int "20"

EDIT: you can launch the indicator with the following command:

$ hamster-indicator
Appindicator for Hamster

Premise

I use Hamster for time tracking at work and the lack of an applet which works with Unity’s panel is my main obstacle to the adoption of Unity (which I love BTW). For this reason I hacked on the applet’s code in my (very limited) spare time at weekends and I managed to get what I needed i.e. a functioning appindicator for Hamster. I wasn’t aiming for the perfect example of usability but simply an indicator which could reproduce the functionality of the old applet, therefore feedback is more than welcome from the design team, design enthusiasts, etc.

Note: I know that there was a discussion about integrating Hamster in the Clock indicator but, as I said, this wasn’t my objective, even though I do not exclude future evolutions of the indicator in this direction. I should talk to upstream too.

Implementation

I adopted a rather opportunistic (call it hackish) approach to the problem. Rather than duplicating code or patching the original code, I chose to create a subclass of the HamsterApplet class (from Hamster’s applet.py) and to override the parts that I didn’t deem suitable for the indicator (such as the panel button and the sticky activity window). Long story short, the code in Hamster does all the heavy lifting while my code deals mainly with keeping the indicator updated. A proper solution would probably involve creating a more generic class which both the HamsterApplet class and my new class can inherit, assuming that this is the path that upstream want to follow (as they might have different plans in mind, especially on the user interaction side).

Results

As you can see, the indicator is very simple. I just re-used the icon from Hamster but I’d love to see a monochromatic one instead.

Click on the “New activity” menu item and you’ll get the old activity dialog near the indicator. I had to make the dialog a decorated window as, otherwise, you wouldn’t have a way to hide the dialog without a panel button, if, for example, you clicked on that menu item by mistake. Clicking “Start Tracking” still hides the dialog.

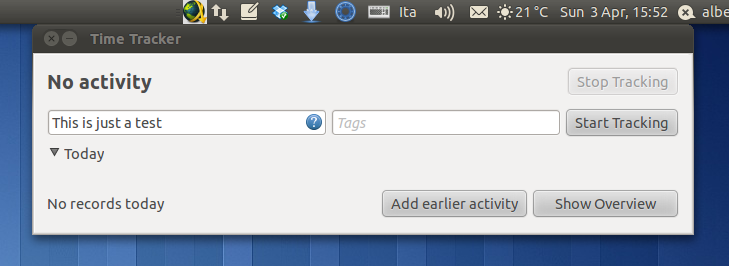
Personally, I’d like to see something smaller than the following dialog, for example without all that’s below the “Today” expander (included) and with the remaining elements arranged in a more space efficient way. Or maybe we could have something other than a dialog to do this (e.g. integration with the Unity dash?). I’m digressing now…


This is the indicator in action. You can click on the activity name so as to get a dialog to edit the current activity or you can also decide to stop the task from the indicator. Of course the old “Add earlier activity” and “Show Overview” dialogs are still there.

Note: the screenshots in this blog post were taken in Maverick 10.10.

How to try it

I haven’t had the time to package it yet but you can simply download the “hamster-indicator” file from the git repository below, make it executable, double click on it and select “run” (at least in Gnome). You also need to have the “hamster-applet” package installed.

The code is hosted here.

I’ll package it and put it in a PPA soon.


On fglrx support in Natty

As I’ve already written in the ubuntu-devel mailing list, a new fglrx driver (2:8.840-0ubuntu1) is now available in Natty and it finally works with the new xserver. There are still a few issues whose fixes should land after Beta 1 is released:

1) compiz needs to be updated so that fglrx can work with Unity. Currently the “Classic Desktop” session works well but the “Ubuntu Desktop” one doesn’t. If you’d like to test Unity with the new driver, you can use Unity’s daily builds from the PPA, as described here.

2) currently the driver is not offered for installation in Jockey. A fix is already available in Jockey’s development branch though. In the meantime, if you wish to install the new fglrx driver, you can do it manually by following these commands:

sudo apt-get install fglrx
sudo update-alternatives --config gl_conf (and select the line with fglrx)
sudo update-initramfs -u

and finally reboot. No xorg.conf is required as the driver will be automatically loaded.

Note: despite what the relevant article from Phoronix claims, the driver doesn’t support AMD’s PowerXpress.

How to set up “Web CoopVoce” (3G) APN on Android

I’m a satisfied owner of a Nexus One (loving Android Froyo 2.2) and today I decided to try a (volume based) 3G plan by CoopVoce.

There are 2 options available: either buy a 3G usb key or simply use 3G directly from your phone. In the former case (which I wasn’t interested in) the usb key works with Linux and you can even download a QT based dashboard which is supposed to set up the connection for you and it works on Ubuntu, Fedora, etc. While this definitely was a pleasant surprise, the lack of instructions to configure your phone wasn’t as pleasant. The website suggests to contact customer service so that they can provide you with the right configuration for your phone (but it seems that they’re not ready for Android phones). Long story short, I decided to download the dashboard instead and explore its contents hoping to find something useful to set up the APN myself. My research was successful and I thought I would share my findings with you.

Enter the “Settings” tool, then select “Wireless & network settings” -> “Mobile networks” -> “Access Point Names” and add a new profile with “New APN”.

Fill in the fields below as follows:

Name: CoopVoce
APN: web.coopvoce.it
MCC: 222 (set by default)
MNC: 01 (set by default)
Authentication type: PAP
APN type: default,supl

Note: I’m not really sure if MCC and MNC are actually useful.

Leave the rest unset. Save and select your new profile, then go back to the Mobile networks settings screen and select “Data enabled” to turn on your 3G connection.

Since this is mostly aimed at people who live in Italy, here’s the Italian translation:

Per configurare una connessione 3G con CoopVoce (web 500 mega nel mio caso) su di un telefonino con Android, entrare nel pannello delle impostazioni e scegliere la schermata di configurazione delle reti (“Wireless e reti”), poi quella per le “Reti mobili” e in seguito quella dei punti d’accesso (“Nomi punti di accesso”). Aggiungere un nuovo APN e riempire i campi come segue:

Nome: CoopVoce
APN: web.coopvoce.it
MCC: 222 (impostato di default)
MNC: 01 (impostato di default)
Tipo di Autenticazione: PAP
Tipo APN: default,supl

Nota: non sono sicuro dell’utilità di MCC e MNC.

Lasciare il resto non settato. Salvare e selezionare il nuovo profilo e infine tornare alla schermata di impostazione delle reti mobili e attivare la connessione 3G abilitando il traffico dati (opzione “Dati attivati”).

Warning for Nvidia users on Lucid

Quoting my email to different Ubuntu mailing lists:

According to Nvidia, drivers 195.36.08 (i.e. the current driver in the
archive) and 195.36.03 might be affected by the same GPU fan speed
issues
which affect the Windows driver:
http://www.nvnews.net/vbulletin/announcement.php?a=39

I have been using these drivers for while now without experiencing
that problem but, if you want to be on the safe side, I suggest that
you temporarily switch to the open driver until we’re sure that the
problem is fixed. In order to do so you can follow either point 1 (the
easy way) or point 2:

1) Disable the driver with Jockey (the restricted drivers manager) and
restart your computer.

OR

2) Open the terminal and type the following commands:
sudo update-alternatives --config gl_conf (and select the alternative
provided by mesa)
sudo ldconfig
sudo update-initramfs -u
sudo mv /etc/X11/xorg.conf /etc/X11/xorg.conf_old

and restart your computer.

Sorry for the inconvenience, I’ll keep you posted on the issue.

Quick updates on Lucid

This is just a brief announcement, I hope to have the time to say more when I’m back to Italy (currently I’m in the US).

  • EnvyNG and Envy are no more. I had no time to maintain them and I really prefer to work on Jockey (I had already contributed code to it in the past) as it’s our general purpose driver manager.
  • The Nvidia installer from Nvidia’s website won’t work anymore because of the new alternatives system that I have implemented in Lucid. I’ll work on this so that it’s fixed before the final release.
  • Thanks to the new alternatives system you will be able to have all of the nvidia drivers and the fglrx driver (when the latter will be compatible with Lucid, that is) installed at the same time but use only one at the time. Switching between drivers will only be a matter of launching Jockey and selecting the driver you need. Ideally (in the future, not in Lucid) you won’t even have to do this and Ubuntu will switch to the right the driver on boot.

I hope to be able to blog more about my work soon.

How to enable/disable Ctrl+Alt+Backspace in (K)Ubuntu Karmic 9.10

As you might have noticed already if you use Ubuntu Karmic, Ctrl+Alt+Backspace (i.e. the shortcut which was used to restart the X server) has to be enabled in a different way with respect to previous releases of Ubuntu.

This is due to the fact that “DontZap” is no longer an option in the X server and has become an option in XKB instead.

As a result, now it’s very easy to use your Desktop environment of choice (e.g. GNOME, KDE) to enable or to disable the Ctrl+Alt+Backspace shortcut. It is also possible to do it without KDE or GNOME.

I recommend that you do it from your desktop environment of choice (as you may find it easier):
Instructions here

P.S. Instructions for XFCE are more than welcome.

X-Bus – a daemon for input devices

What is X-Bus?

It’s a personal project I’ve been working on (among other things) since I joined Canonical. It’s a daemon which handles input devices through the XInput protocol. In the future I hope to add support for outputs too.

What’s the purpose of X-Bus?

Its main purpose is to provide developers with a common (and simplified) way to access XInput from languages which have DBus bindings (Python, Ruby, C, C++, Java, Perl, etc.). It is not specific to any desktop environment, even though it uses C++ and QT4 (see below).

Wouldn’t it be nice if we could have KDE, Gnome, Xfce, etc. applications which make use of the same backend with different frontends (as opposed to having different backends and frontends)?

Current features:

  • Exposes XInput (listing/setting properties, catching signals, etc.) through Dbus with a simplified API.
  • Stores the (per-user) current inputs configuration in an XML file and applies it at startup or when requested.
  • Emits signals (through Dbus) when new devices are plugged in or unplugged (so that, for example your client application can refresh its UI to reflect the new situation).
  • Tracks keyboard activity so as to disable your touchpad when you’re typing.

It’s an attempt to combine the features in syndaemon and xinput (the command line tool), from both of which X-Bus borrows code.

3 examples of what X-Bus can be used for:

  • User interfaces to configure touchpads (which is the 1st thing I would like to work on).
  • User interfaces to configure touchscreens whose drivers support XInput (I still need to expose the calibration functions provided by XInput though).
  • Automatic rotation of your touchpad (figuratively speaking) when your screen is rotated (after this is implemented).

Why QT?

Because of its DBus and XML modules and because it’s a pleasure to work with QT in general.

Example: if you add the Q_SCRIPTABLE macro to the function in the header file, this function will be made available in your DBus interface. This applies to signals too. This makes maintenance a lot easier.

In my opinion it would be overkill to use the DBus low-level API and I don’t think the glib (DBus) bindings can offer what I described in the example (feel free to prove me wrong on this). Furthermore I would have to use an external xml module to perform validation and the things that I currently do with the xml file.

Doesn’t it duplicate efforts? Why don’t you work on $INSERT_DAEMON_HERE instead?

Yes, it does (partially) but my point is: can we use $INSERT_DAEMON_HERE on KDE, Gnome, Xfce, etc. ?

Furthermore, if you have a look at X-Bus’ API you’ll see that (currently) there’s very little duplication.

Where’s the code?

Source code (have a look at the examples which are written in Python)
Packages

NOTE: this is just a first release and users won’t benefit from it without a user interface (unless they want to edit the xml file manually).

On my New Job

It’s been almost a month now since I started working for Canonical. I was hired as a “Sustaining Engineer (System)” in the Foundations team which, in turn, is part of the OEM Services team, whose offices are located in Lexington, Massachussets, USA (I work from home though).

I mainly do work on X.org related stuff (e.g. touchpads, graphics drivers, etc.) in order to solve problems such as the ones that Canonical’s customers report and to develop new things (I hope to be able to blog about my new projects).

I really like this job as it allows me to work on the things I’m passionate about in a very friendly and relaxed work environment. It means a lot to me.

I would like to thank all the people who made this possible, the ones who kept providing me with new challenges in Ubuntu which made me acquire experience that is proving extremely valuable in my job. I would also like to thank all the people who supported me and encouraged me to apply for this job at Canonical, my team mates and team manager(s) who helped me move my first steps at work and to feel at ease and deeply involved in the OEM team, and the impressive amount of people who congratulated me on IRC on my first day of work. It was a warm welcome that I’ll never forget.

It’s an honour to work with you and I hope we can all work together to fix bug #1.

I hope to see you at the next UDS in Barcelona in May.

How to enable/disable Ctrl+Alt+Backspace from the command line

If you don’t want to use a user interface to change the effect of Ctrl+Alt+Backspace in any flavour of Ubuntu you can follow these steps:

1) Install the “dontzap” package
sudo apt-get install dontzap

2) Open Terminal or Konsole and type:
sudo dontzap --enable
or
sudo dontzap --disable

Where “disable” means that Ctrl+Alt+Backspace restarts the xserver while “enable” means that it won’t.

I’ll post something on the GTK UI when it’s ready.